정렬할게 있어서 퀵소트를 만들려고 #include를 넣는데 내가 왜 이러고 있나 싶어 검색해보니 좋은게 하나 있다.
[ void qsort (void* base, size_t num, size_t size, int (*compar)(const void*,const void*)) ]
[ http://www.cplusplus.com/reference/cstdlib/qsort/ ]
배열, 구조체모두 정렬이 가능하다. 아름다운 함수다.
이제는 선검색 후 구현을 해야겠다.
2015년 11월 12일 목요일
2015년 5월 20일 수요일
MFC DLL에서 Dialog생성시 Assert Err
MFC에서는 메인의 리소스핸들을 사용하는대 DLL에서 다이얼로그를 생성하려면 DLL의 리소스 핸들이 필요하다.
때문에, DLL의 리소스 핸들로 바꾸어줘야한다.
생성전에 AFX_MANAGE_STATE(AfxGetStaticModuleState( )); 메크로 추가해야한다.
이거때문에 먼 삽질인가
2015년 3월 23일 월요일
FFMPEG 빌드 with openh264
https://github.com/cisco/openh264/issues/1529
openh264는 mingw + msys로 빌드, ffmpeg는 cygwin으로 빌드(Cross compile: https://trac.ffmpeg.org/wiki/CompilationGuide/CrossCompilingForWindows)
1. openh264 빌드
1.1 openh264 다운
- git(https://github.com/cisco/openh264.git) 으로 받거나 홈페이지에서 다운(https://github.com/cisco/openh264)
1.2 openh264 빌드
- make install PREFIX=/경로
- mingw+msys사용함
- nasm.exe가 필요 (http://www.nasm.us/pub/nasm/releasebuilds/2.11.08/) 적당히 높은버전 받고 mingw/bin에 복사하면됨. 그리고 빌드~~
- 성공하면 bin, include, lib 폴더가 생김.
2. FFMPEG 빌드
2.1 FFMPEG 다운
- 역시 git(git://source.ffmpeg.org/ffmpeg.git)으로 받고나 홈페이지에서 다운(https://www.ffmpeg.org/download.html)
- 이걸로 돈벌거 아니면 그냥 홈페이지 가서 빌드된거 다운받는게 정신건강에 좋음
2.1 configure 입력하기 전에 'export PKG_CONFIG_PATH=/빌드한 openh264/lib/pkgconfig' 로 pkg 경로설정?? 먼지 나도 잘 모름 ㅡㅡ
2.2 이제 아래 커멘트 입력 후 엔터 그럼 주르륵 머가 뜸, 시간이 좀 걸림, 난 encoder, decoder하고 기타등등이 필요하기에 아래처럼 했음, 대충 필요한거 찾아다 입력하면됨, ./configure --help하면 적당히 찾을 수 있음, 그리고 요래 하면 dll 용량이 확 줄어듬, 필요한것만 enable하는것을 추천함
[cygwin에서]
./configure --extra-ldflags=-static-libgcc --enable-shared --enable-cross-compile --arch=x86 --cross-prefix=i686-w64-mingw32- --target-os=mingw32 --enable-runtime-cpudetect --enable-pic --disable-doc --enable-memalign-hack --disable-everything --enable-decoder='h264,mpeg4,mjpeg' --enable-libopenh264 --enable-encoder=libopenh264 --extra-cflags=-I빌드한 openh264/include --extra-ldflags=-L빌드한 openh264/lib --enable-filter=yadif --prefix=`pwd`/../ffmpeg_w32_dist
openh264는 mingw + msys로 빌드, ffmpeg는 cygwin으로 빌드(Cross compile: https://trac.ffmpeg.org/wiki/CompilationGuide/CrossCompilingForWindows)
1. openh264 빌드
1.1 openh264 다운
- git(https://github.com/cisco/openh264.git) 으로 받거나 홈페이지에서 다운(https://github.com/cisco/openh264)
1.2 openh264 빌드
- make install PREFIX=/경로
- mingw+msys사용함
- nasm.exe가 필요 (http://www.nasm.us/pub/nasm/releasebuilds/2.11.08/) 적당히 높은버전 받고 mingw/bin에 복사하면됨. 그리고 빌드~~
- 성공하면 bin, include, lib 폴더가 생김.
2. FFMPEG 빌드
2.1 FFMPEG 다운
- 역시 git(git://source.ffmpeg.org/ffmpeg.git)으로 받고나 홈페이지에서 다운(https://www.ffmpeg.org/download.html)
- 이걸로 돈벌거 아니면 그냥 홈페이지 가서 빌드된거 다운받는게 정신건강에 좋음
2.1 configure 입력하기 전에 'export PKG_CONFIG_PATH=/빌드한 openh264/lib/pkgconfig' 로 pkg 경로설정?? 먼지 나도 잘 모름 ㅡㅡ
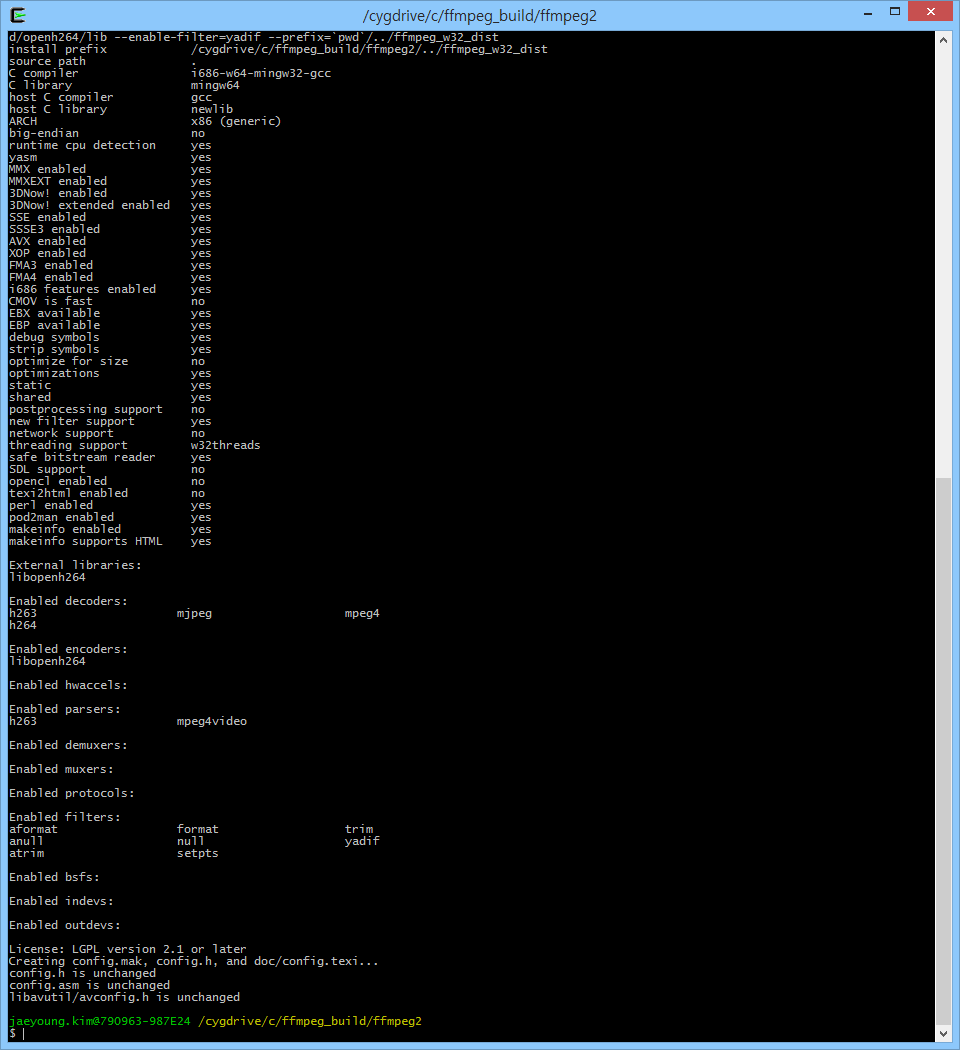
2.2 이제 아래 커멘트 입력 후 엔터 그럼 주르륵 머가 뜸, 시간이 좀 걸림, 난 encoder, decoder하고 기타등등이 필요하기에 아래처럼 했음, 대충 필요한거 찾아다 입력하면됨, ./configure --help하면 적당히 찾을 수 있음, 그리고 요래 하면 dll 용량이 확 줄어듬, 필요한것만 enable하는것을 추천함
[cygwin에서]
./configure --extra-ldflags=-static-libgcc --enable-shared --enable-cross-compile --arch=x86 --cross-prefix=i686-w64-mingw32- --target-os=mingw32 --enable-runtime-cpudetect --enable-pic --disable-doc --enable-memalign-hack --disable-everything --enable-decoder='h264,mpeg4,mjpeg' --enable-libopenh264 --enable-encoder=libopenh264 --extra-cflags=-I빌드한 openh264/include --extra-ldflags=-L빌드한 openh264/lib --enable-filter=yadif --prefix=`pwd`/../ffmpeg_w32_dist
[mingw에서]
LDFLAGS="$LDFLAGS -static-libgcc" ./configure --extra-ldflags=-static-libgcc --enable-shared --enable-cross-compile --arch=x86 --target-os=mingw32 --enable-runtime-cpudetect --enable-pic --disable-doc --disable-everything --enable-decoder='h264,mpeg4,mjpeg' --enable-libopenh264 --enable-encoder=libopenh264 --extra-cflags=-IC:/openh264/include --extra-ldflags=-LC:/openh264/lib --enable-filter=yadif --prefix=`pwd`/../ffmpeg_w32_dist
대충 이런느낌 에러만 안나면될거임 아마도;
make 이거도 시간좀 걸림
make install 이건 좀 빠름 하면 설정한 경로에 주르륵 *.dll, *.lib *.h 파일등이 생김
그럼 LGPL 라이센스로 encoder 사용할 수 있음. GOOD~!
성능은 잘 모르겠음. 그냥 x264(GPL)가 더좋아보임
2015년 3월 12일 목요일
FFMPEG Video Decode
기본예제 http://ffmpeg.org/doxygen/trunk/decoding_encoding_8c-example.html#a83
AVCodec *pDecodeCodec = avcodec_find_decoder(AV_CODEC_ID_H264);
AVCodecContext *pDecodeCodecCtx = avcodec_alloc_context3(pDecodeCodec);
int nRet = avcodec_open2(pDecodeCodecCtx, pDecodeCodec, NULL);
if(nRet<0)
fprintf("err\n");
AVPcket avpkt;
av_init_packet(&avpkt);
avpkt.data = (uint8_t*) stream; //영상데이터의 포인터
avpkt.size = sizeOfStream; //영상데이터의 크기
AVFrame *pFrame;
pFrame = avcodec_alloc_frame();
int got_picture = 0;
nRet = avcodec_decode_video2(pDecodeCodecCtx, pFrame, &got_picture, avpkt);
if(nRet < 0)
fprintf("err\n");
if(got_picture)
Docode 결과는 pFrame에 저장
이렇게 하면 디코딩이 된돠~
!!!주의 alloc한것들은 모두 free해줄 것.
다음에는 MFC에서 디코드된 결과를 화면에 뿌려주는것 정리해야지
- Decode(H264 Codec)
avcodec_register_all();
AVCodec *pDecodeCodec = avcodec_find_decoder(AV_CODEC_ID_H264);
AVCodecContext *pDecodeCodecCtx = avcodec_alloc_context3(pDecodeCodec);
int nRet = avcodec_open2(pDecodeCodecCtx, pDecodeCodec, NULL);
if(nRet<0)
fprintf("err\n");
AVPcket avpkt;
av_init_packet(&avpkt);
avpkt.data = (uint8_t*) stream; //영상데이터의 포인터
avpkt.size = sizeOfStream; //영상데이터의 크기
AVFrame *pFrame;
pFrame = avcodec_alloc_frame();
int got_picture = 0;
nRet = avcodec_decode_video2(pDecodeCodecCtx, pFrame, &got_picture, avpkt);
if(nRet < 0)
fprintf("err\n");
if(got_picture)
Docode 결과는 pFrame에 저장
이렇게 하면 디코딩이 된돠~
!!!주의 alloc한것들은 모두 free해줄 것.
다음에는 MFC에서 디코드된 결과를 화면에 뿌려주는것 정리해야지
2015년 2월 25일 수요일
2015년 2월 24일 화요일
2015년 2월 9일 월요일
2015년 2월 4일 수요일
SetStretchBltMode(HDC, OPTION)
StretchDIBits으로 그림(사진)의 크기를 변경하여 그릴때 그림이 뭉게 지는것을 막기 위해 사용한다.
StretchDIBits() 함수를 실행하기 전에 사용하면 되겠다.
ex) SetStretchBltMode(cdc->m_hDC, HALFTONE);
https://msdn.microsoft.com/ko-kr/library/windows/desktop/dd145089(v=vs.85).aspx
StretchDIBits() 함수를 실행하기 전에 사용하면 되겠다.
ex) SetStretchBltMode(cdc->m_hDC, HALFTONE);
https://msdn.microsoft.com/ko-kr/library/windows/desktop/dd145089(v=vs.85).aspx
2015년 2월 3일 화요일
피드 구독하기:
글 (Atom)